Category Archives: Citrix

Installing XenDesktop 7 Part 5 - Configuring Storefront 2.0

The final part of this series Installing Citrix XenDesktop 7. We are going to walk you through the configuration of a Storefront 2.0 site.

Open the Citrix Storefront console and you will see a very similar layout to the current console We will begin by creating a new store:

image

Step one is to create a store name. We recommend using a simple name as this becomes part of the URL that you are using to access the farm

image

Next we need to add the delivery controller. This will be the servers name by default and this will be configured on port 80. Here you can add AppController Server, VDI-In-A-Box, XenDesktop or XenApp hosts

image

Next you can configure your NetScaler or Access gateway configuration if you are using these as your access methods. We are not going to run through this for this demonstration, but this is the same process for previous versions

image

Finally Click create and the server will create your Storefront store and that is it done!

image

As you can see this is probably the simplest deployment of Citrix XenDesktop 7 to date. There are a  lot of design decisions that need to be planned out, and a large number of tools and technologies that we have not touched on such as Citrix XenApp and App-V integration.

If blog readers are interested in these features drop us an email, and we will address the topics over the coming weeks.

If you need any help or advice please feel free to get in touch and we will run through your requirements.

If you have any questions about the blog post please direct any questions to [email protected]

Installing XenDesktop 7 Part 4 - Creating Catalogues

In the previous articles we have gone through installing XenDesktop 7 on a single machine, creating your first farm and in the last article we demonstrated the installation of the Virtual Desktop Agent onto a Windows 8.1 Preview machine.

We are now going to show you how to configure a catalogue and how to make these machines available to your users.

On your XenDesktop Controller open up the Citrix XenDesktop 7 studio console and at this stage it should like like the following:

image

Click on Create Catalogue

you are now presented with the create catalogue wizard click next, you can optionally choose not to display the first message again.

image

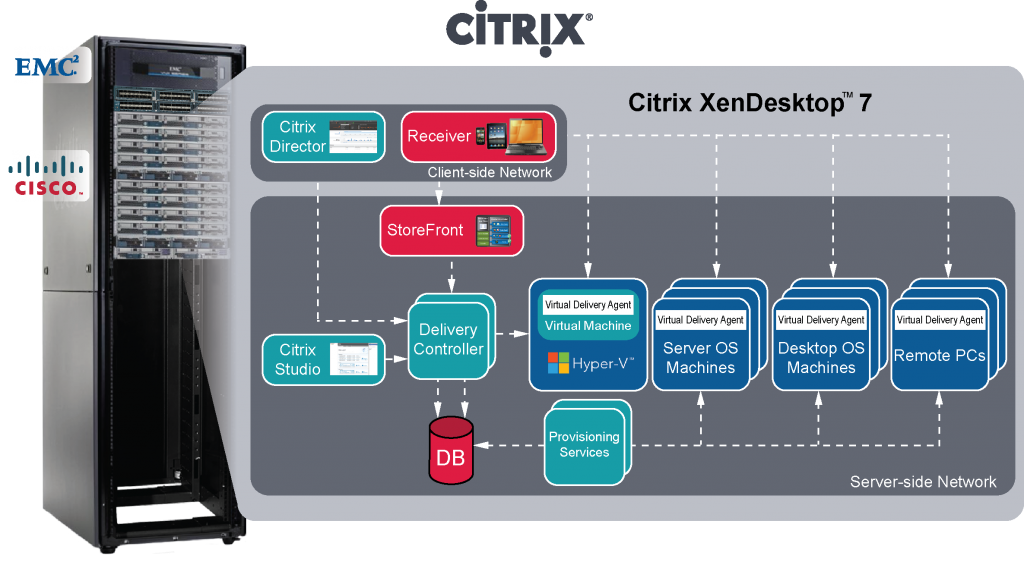
First we need to choose the type of catalogue we are going to create, we have three options:

  1. Windows Desktop OS – For delivering Windows VDI machines
  2. Windows Server OS – For publishing XenApp desktops/applications
  3. Remote PC Access – For delivering remote access to physical PC’s

We are going to be selecting option 1 to deliver Windows Desktop OS

image

Next we need to choose what type of infrastructure we are going to deliver physical or virtual, we are using virtual desktops. We also need to choose what delivery method you need.

The three options are

  1. Machine Creation Services
  2. Provisioning Services
  3. Other

We will be leveraging the inbuilt Machine creation services

image

Next you need to choose what type of experience the users are going to have. You need to choose between static or dynamically assigned desktops and whether users will be able to make changes to their desktops. For the purposes of this demonstration we will be using dynamic desktops with the deployment of personal vDisk’s so that users have the option of dynamically installing their own applications, these design decisions should be completed prior to your deployments

image

The wizard will now communicate to your virtual infrastructure and will give you the option to choose what virtual machine will be used as the base image for your new desktops. We have created a snapshot which you can see in the following image labelled as 0.1. This is so that any further updates to the Virtual machine can be made. With a new snapshot created, the desktop pool can be updated to use any newer snapshots.

image

In the next screen you will be able to select how many virtual machines that you would like to create, how many vCPU’s you want to define, and the amount of RAM assigned to each machine. The defaults are created by what the virtual machine is currently setup with. You are also given the option to select how much capacity is to be assigned to personal vDisk’s, and the drive letter that the personal vDisk will be assigned once the machine is up and running.

image

Next you need to select into what Organisational Unit (OU) the Desktop’s Active Directory Machine Accounts will be created. We have created a Computers OU under a Citrix OU in our domain in preparation for this.

You will also be able to select the machine name’s that are created, so we have created a default naming scheme of DMMSW81###, during the creation of the machines the ### will be replaced with an number to ensure that no overlapping machine names are used.

image

Finally you will need to create a catalogue name and description and review the summary of what you are about to create:

image

Click finish and the machine creation will begin. This may take some time dependant on your infrastructure and the number of machines that you have chosen to create.

The wizard will now create a copy of your master image, create the machines on your virtual infrastructure and create the relevant Active Directory computer accounts

image

To finalise the deployment in XenDesktop 7 you now need to create a delivery group and assign some users:

image

The first step in creating the delivery group is to select what catalogue of machines you would like to add, for this demonstration we only have the catalogue we created earlier, you will also need to assign the number of desktops from the catalogue that you would like to add.

image

Next you need to choose what you are delivering. Shown here we are delivering the full desktop

image

Next you will need to assign the users that you require to have access to these desktops.We recommend setting up Active Directory groups for each delivery group but you can add indivdual users if required.

image

As we installed Receiver into the base image as part of the VDA installation, a nice new feature is the ability to configure receiver for a Storefront server automatically when creating the delivery groups, as we have not configured Storefront yet, this is not possible, but this can be changed at a later time

image

The final screen is the usual summary. You are also given the options to name the delivery group and setup some options that users will see when they log into Storefront/NetScaler

image

And that wraps up this part of the demonstration, as you will see you will have a lot more information in the Citrix studio console and you will be able to test the configuration that you have created:

image

If you have any questions about the blog post please direct any questions to [email protected]

Installing XenDesktop 7 Part 3 - Installing XenDesktop 7 Virtual Desktop Agent

Before we can continue to create catalogues as part of our XenDesktop 7 installation series we need to have available Virtual Desktops. In this part of the series we will show you how to install the basic Virtual Desktop Agent (VDA). To complete this tutorial we are deploying the VDA to a Vanilla Windows 8.1 (Blue). The process and settings will be the same for any Windows 7 or 8 builds.

So after inserting ISO and progressing through the welcome screen, you will notice everything is greyed out that does not apply to installing on a client OS.

We need to select “Virtual Delivery Agent for Windows Desktop OS”

image

As we are going to utilise this a client VM for our XenDesktop 7 Farm, we will select the default “create a master image”

There is a second option to if you will be configuring the VDA for physical machines

image

With the many improvements to XenDesktop 7 improved 3D hardware pass through capabilities utilising the likes of Nvidia K2 grid cards, you are offered to the option to utilise HDX3D pro. As we do not have this hardware in our infrastructure we will not be deploying it as part of this demo, so leave the default selection of no

image

In the next part of the wizard you will be offered the opportunity to alter the default installation location. You will also be given the option to deploy the latest Version 4 of Citrix Receiver as part of the deployment, you may want to deploy this through third party software management tools such as Microsoft System Centre, but as part of this tutorial we will just install a the standard receiver.

image

Next you will need to decide how you the VDA will register with the Dedicated Desktop Controllers (DDC) you are given four options:

  1. Do It later – not sure why you may want to do this unless you are creating generic builds for an LaaS solution
  2. Add it manually – here you can manually add the Fully Qualified Domain Names (FQDN) of your delivery controllers, this adds extra burden as a delivery controller change will mean an image update is required
  3. Chose Locations from Active Directory – similar to earlier versions of XenDesktop, you can run a script to create relevant entries in Active Directory (AD) so you can dynamically update the list of DDC’s in AD this was the proffered method in earlier versions of XenDesktop, and remains so if you don’t plan on using Machine Creation Services (MCS) i.e using Provisioning Services (PVS)
  4. Let Machine Creation Services do it automatically – if you utilise MCS the delivery controllers will automatically add in their addresses when creating machines

For this tutorial we are using MCS so we will select option number 4 “Let Machine Creation Services do it automatically”

image

The VDA installation process will then offer to setup the following automatically for you

  • Optimize the client, this will go through and disable certain services that are not required and optimize your machine for XenDesktop7
  • It will enable Windows remote assistance, so that you can connect to your clients from Desktop Director giving your support teams flexible assistance options
  • Utilise real time audio transport
  • Enable Personal vDisks,

This is a design decision that needs to be made as part of your solution. As part of this demo we are going to utilise personal vDisks so we are ticking this box.

image

Similar to the Desktop Controller installation all of the firewall requirements are listed out for you. If you plan to add them manually, specifically if you do not use the Windows Firewall, the ports are listed as in previous posts.

We do use Windows Firewall so we are going to allow the installer to make these changes to the firewall rules

image

Finally you will be presented with a summary of the selections that you have made. We strongly recommend that you read through these and make sure you have set everything up as you intended. As you can see all of the pre-requisites are installed as part of the installer.

Once you are happy click Install.

image

The installer will take approximately 10 minutes based on your hardware specs and is surprisingly very quick to complete. All in all the VDA agent took just 6 minutes in our demo environment

image

Once the installation has completed it recommended to restart the machine.

And that is it, the VDA agent as you can see is a simple installation process that runs very quickly

image

Enjoy

If you have any questions about the blog post please direct any questions to [email protected]

Deploying Citrix XenDesktop 7 Part 2 - Configuring Your Site

In our previous post Installing Citrix XenDesktop 7  Part 1 we showed you how easy the initial installation is of the new Citrix XenDesktop 7 suite of products is. In this second part we are going to run through how to setup your first site ready to start deploying Windows 7 and 8 Virtual Desktops and Windows 2008 R2 and Windows 2012 XenDesktop for application publishing (XenApp).

Further to the existing pre-requisites in the previous post an SQL server is required, for a small deployment SQL 2012 express can be deployed as part of the installation. As before in the previous post we are utilising an existing SQL 2012 server where we have created a blank database called XenDesktop7 with a specified windows service account for authentication.

So the first step is to open the Citrix Studio console and click the getting started link

image

The first screen presents you with two options, the first is the most simple deployment and enables you to configure your entire site in a single process, the second option “Create an Empty Site” will give a more granular approach to the deployment, we will select the first option and add a name to our site:

image

The first task is to setup the connection to the database, if you have installed SQL express locally the information will be pre-polulated here for you. We are going to provide the fully qualified domain name of our SQL server (or an alias if you plan on moving it) and the name of the database

image

Oce you have entered the details for your SQL server and database name (and instance name if required) we reccomend selecting the “test connection” button to ensure you have entered the correct information, because we are using a dedicated service account to access the database that is a different user account tot he one we are currently logged in as for the deployment the wizard will notify you of its lack of ability to connect to the SQL server select “OK”:

image

A second popup box will offer you the option to alter the credentials used to access the SQL database go ahead and select “yes”

image

You will then be presented with a standard windows security dialogue to enter your service account credentials:

image

If you do enter incorrect credentials you will be given a little more help, a nice touch here I entered the credentials of the service account incorrect:

image

Once you have the correct credentials and all tests are successful you can move on through the wizard

image

The next step is to configure your license server. We have deployed the license server on the same machine so localhost:27000 is correct. You can then either utilise the free 30 day trial to carry on the setup, register a license key code or import an already activated license file.

image

We need to configure your hosting infrastructure, here you have three choices, Citrix XenServer, VMware vCenter, or Microsoft System Centre Virtual Machine Manager. We are using XenServer.

image

Once the hosting infrastructure is connected you will then be given the opportunity to select the networks that will be used by clients

image

The storage will be setup next, by default if the wizard detects shared storage you will be able to choose the LUN’s that you would like to use, in the dropdown you will also see the options to add local storage should you not have any SAN infrastructure. If you want to utilise Personal vDisks (and why wouldn’t you?) you can set them to be hosted on a specific LUN or with the users virtual machines this will be a design decision you will need to make.

image

With the deprecation/retirement of the Citrix streaming profiler, direct integration with App-V 5 management infrastructure is now possible. We will discuss this in more depth in a further post suffice to say the integration is a welcome step and makes publishing App-V applications a hell of a lot easier. For the purposes of this blog we are going select no but this can be changed at a later date:

image

You will finally be presented with a final summary detailing your selections we  would recommend running through these and ensuring you selected everything correctly and click finish

image

You will then get a progress dialogue detailing what changes are being made

image

Once the configuration has completed the next steps will be to create catalogues, configure storefront and setup role based access for your administrators. you will then be ready to deploy your first servers and desktops.

image

In Part 3 of this series we will run through some of the basic catalogue configurations for the XenDesktop for applications and of course XenDesktop VDI Clients.

If you have any questions about the blog post please direct any questions to [email protected]

Installing Citrix XenDesktop 7 Part 1 - Dedicated Desktop Controller

With the release of Citrix XenDesktop 7 this yesterday we have been busy updating our Demonstration Environment to showcase the latest technologies and to update some of our Virtual machines to utilise Microsoft Windows 2012 now that it is now a supported platform.

For this tutorial we are going to demonstrate the ease of deployment of your first Citrix XenDesktop 7 Dedicated Desktop Controller (DDC). On this virtual machine we are going to deploy the following components:

  • Citrix XenDesktop 7 Studio – the primary management platform for the new architecture
  • Citrix Desktop Director – the primary monitoring tool and the replacement for Citrix Edge sight
  • Citrix Storefront 2.0 – the updated release of Storefront 1.* and the replacement for the more traditional Web Interface 5.* infrastructure
  • Citrix Licensing server

In a production environment we would almost certainly separate these components onto their own virtual machines, but for this demonstration we will deploy all the required roles onto a single server.

As a minimum recommended specification the virtual machine is configured with the following hardware

Server OS Disk Drive 0 Disk Drive 1 Memory vCPU’s
Windows 2012 C:\ 50GB D:\ 20GB 5GB minimum 2

Citrix lists the full requirements for each separate application on their eDocs site here:

http://support.citrix.com/proddocs/topic/xendesktop-7/cds-sys-requirements.html

The 5GB minimum recommended requirement is made up of the 3GB requirement for the Desktop Controller and 2GB for Storefront.

After inserting the CD (ISO) and letting the CD auto run you are first presenting with the new start screen this is where your journey begins:

image

You are now presented with a list of options dependant on what products you would like to deploy,

image

We are going to select “Get Started” and deploy our first delivery controller, as you can see from here you can deploy all of the required components

image

If we were deploying a Citrix XenDesktop Delivery Agent we would chose one of the following:

image

As you can see the installer has detected we are on a server OS and greyed out the options to install a Desktop OS Agent.

As we said earlier all of the components can be installed individually and these can be selected from the final column “Extended Deployment”

image

Once we launch the Getting started column the wizard is a fairly simply run through as we will show you now. As usual with most software these days the first menu is to agree to the terms of the liscensing agreement and click Next:

image

Next you are given the option of what location to install the components to by default this is C:\Program Files\Citrix, and what components you would like to install: for the purposes of this demonstration we are going to install all of the components on a single server VM:

image

Next you can choose if you would like to install SQL Express Locally on your server for the data store, and whether you would like the Windows Remote Management tools installing to enable shadowing FROM the server you are deploying to. In this instance we already have a SQL 2012 Server with an empty database ready for our deployment so we are not going to install SQL Express locally. If you do install SQL Express and create a local database this can be moved to a full blown SQL installation at a later date. We are also going to install the Windows Remote Management tools as we are deploying Desktop Director on this server and we will want to manage out from this machine.

image

The next menu gives you the option to setup any locally installed firewalls, we utilise the inbuilt Microsoft firewall where possible, so we will allow the installer to make the necessary changes, this is a nice improvement as it lists the changes you will need to make if your are running any third party firewall products and gives you the details to manually make the changes.

image

The wizard will then show a summary of your selections it is always worth double checking that everything is as required and then simply click install. As you can see all of the pre-requisites are handled with the installer so Visual C++ 2008 runtime, IIS and the Remote Support features will all be installed as part of the product installation.

image

The program will begin installing the components as can be seen it is estimated to take 10 minutes or so.

All in all the installation took 5 minutes and once it is complete you can then launch Citrix Studio and configure your site

image

And that is it for installing CItrix XenDesktop 7, it takes 7 mouse clicks (coincidence or planned???)

Once the Studio has launched you will be presented with several options for configuring your site:

image

We will create a new post detailing the configuration options and what is required to complete the initial configuration to get you site up and running in a future post. Check back soon for an update.

If you have any questions about the blog post please direct any questions to [email protected]

Running Windows Multicast Network Load Balancing (NLB) on XenServer 5+6 guests

We have recently been implementing Windows Network Load Balancing (NLB) on a few clients sites for the Citrix Web Interface and Storefront services, and the implementation on XenServer guests posed a few issues where once the NLB was enabled connectivity would fail.

There are a lot of sites with information regarding Unicast and creating static ARP entries but this we found was not relevant.

The default configuration for XenServer and likely Open vSwitch in general sets multicast to off on the guest virtual machines. Re-enabling Multicast resolved our issues so we set this up on a per machine basis. It is possible to alter this setting globally for all machines which I will show you later, but we cannot confirm what adverse effects this may have.

To begin with locate the XenServer host which your Virtual machine is currently running on and SSH to it.

Once you have logged in as root run the following command to locate the VIF if of the virtual machine:

xe vm-list name-label=<VM NAME Goes here> params=dom-id

image

You will then see the DOM-ID of the VIF associated with your Virtual machine, in the above example this is 21

To first check that multicast is not enabled run the following command:

ifconfig vif<DOMID>.0

As canbe seen below there is no multicast listed

image

To setup multicsat on your VIF run the following command:

ifconfig vif<DOMID>.0 multicast

To confirm this has worked run the same command as above

ifconfig vif<DOMID>.0

image

And you should now see Multicast in the configuration of the VIF.

You can enable multicast for all virtual machines, although as this is not the default unless you have a specific need we would not necesarily recommend this but it is possible by editing the the following file on all of your XenSerer hosts:

/etc/xensource/scripts/vif

Locate the add_to_bridge section within this file and put a # in front of the following line:

${IP} link set “${dev}” multicast off               || logger -t scripts-vif “Failed to ip link set ${dev} multicast off”

image

If you have any questions about the blog post please direct any questions to [email protected]

Citrix XenApp 6.5 Feature Pack 2 Announced

landing_xenapp (600 x 206)

Citrix Announce XenApp 6.5 Feature Pack 2

Enhance seamless delivery of apps across devices and extend 3D graphics experiences to more users

It is reconginsed by Iconic and Citrix that the existing customers of Citrix XenApp 6.5 may be reluctant to move to the new XenDesktop 7 experinece just yet – so with this in mind Citrix has released Citrix XenApp 6.5 Feature Pack 2. Iconic will be releasing this into the Demonstration Suite for our customers to experience as soon as it is available. Check back soon for any updated blogs and installation guides / issues that may arise.

Citrix XenApp 6.5 FP2 provides new functionality, sharing many of the innovations with the XenDesktop 7 release. The latest functionality includes seamless delivery of apps through a newly redesigned unified app store and clientless Citrix Receiver. Hardware-based GPU sharing of OpenGL-based apps lowers the cost of delivering powerful 3D graphics apps. The latest Windows app compatibility and management tools from Citrix and Microsoft accelerate physical to virtual (P2V) migrations and deployment.

Unified app store for desktops, apps, mobile and data*

  • Redesigned Citrix StoreFront unifies app and desktop access through a seamless user experience, whether on the corporate network or remote through Citrix NetScaler Gateway.
  • Updated Citrix Receivers are so easy to install that users can do it themselves. Users simply enter their corporate email address after installation to automatically configure Receiver.
  • Clientless Receiver experience renders apps and desktops in a browser in the event that a native Receiver cannot be installed on a user’s device.

3D professional graphics delivery at lower cost

  • Unique GPU-sharing technology for XenDesktop hosted-shared sessions extends the reach and value of delivering 3D professional graphics apps to non-designers that view and edit 3D data.
  • Latest OpenGL, Direct X, CUDA and CL versions supported

Windows app compatibility and management

Virtualize apps faster with AppDNA**
  • Analyse existing Windows apps for use in hosted shared environments and then automatically remediate and prepare the apps for immediate use on XenDesktop.
Latest Microsoft integrations including Hyper-V3 support
  • Microsoft Lync 2013 VDI plug-in for Citrix Receiver for Windows enables optimized audio and video performance of the latest Microsoft Lync 2013 client for VDI and hosted-shared delivery technologies.
  • Microsoft System Center Configuration Manager (SCCM) 2012 Connector enables administrators to deliver any Windows application to any user on any device through Citrix Receiver as a XenApp deployment type.

If you have any questions about the blog post please direct any questions to [email protected]

Citrix XenDesktop 7 Released Today

Iconic can announce the news that Citrix XenDesktop 7 (formerly Project Excalibur) is now available for download and install today - 26th June 2013.

We have already downloaded XenDesktop 7 and started an install- we will keep you posted how this goes.

New updates to this blog will include a step by step screenshot guide on a basic install so check back on our blogs to be kept up to date as this will be available shortly.

Iconic will deploy XenDesktop 7 to our Demonstration Environment – if you want to arrange a preview look at the new features please feel free to have a look.

Below is a copy of the reference architecture which XenDesktop 7 brings to the table. The ability to publish applications and desktops – both server and VDi Desktops from one console is quite simply brilliant. Above and beyond this the new storefront is pretty great as well.

Below is a list of features listed about XenDesktop 7 and how we anticipate a great take up from new and existing clients.

Citrix XenDesktop 7 offers integrated Windows application and desktop mobility, easier deployment options and simplified management, all delivered through cloud-style architecture console. Current XenDesktop and Citrix XenApp® customers will find the new architecture easier than ever to deploy, manage and support. XenDesktop 7 represents the state-of-the-art in application and desktop virtualization, enabling any business to mobilize Windows apps and desktops and deliver them as a cloud service to any device.

Feature List

New HDX Mobile™ Technologies Deliver an Intuitive, Mobile-Friendly Experience

Enterprises are under mounting pressure to respond to the demands of an increasingly mobile workforce and BYOD. However, most businesses use Windows apps that were never meant to be mobile. Breakthrough technologies in XenDesktop 7 enable any Windows app to function intuitively and transparently on mobile devices, providing a seamless experience on devices of any type. Innovative touch screen capabilities translate multi-touch gestures and finger swipes into smooth navigation and scrolling commands. Native menu controls streamline interaction with the application by translating pull-down lists and complex mouse navigation. Powerful compression and redirection technologies automatically adjust to accommodate mobile broadband networks. Industry-leading HDX technologies now fully incorporate H.264 compression for a 100 percent increase in WAN bandwidth efficiency. New HDX compression capabilities can dynamically optimize the bit rate of full HD video so it is viewable over 3G mobile networks. New Citrix StoreFront interface unifies and secures app and desktop access through a seamless user experience - whether on the corporate network or away from the office via the Citrix NetScaler® Gateway solution.

Simple to Deploy, Manage and Support

XenDesktop 7 simplifies administration and operations with purpose-built consoles for managing and deploying virtual apps and desktops:Simplified workflows and automated configuration checking to eliminate as much as 80 percent of the time and effort needed to deploy new services. Wizard-driven installation gets deployments up and running in 20 minutes. Advanced cloud management capabilities provide a purpose-built help desk console and real-time troubleshooting with EdgeSight® end-user experience analytics tools.

Cloud-style Architecture Designed for Automation and Scale

XenDesktop 7 integrates the market-leading XenApp and VDI desktop virtualization technologies into a unified FlexCast Management Architecture (FMA) for the most scalable solution for delivering Windows apps and desktops as cloud services. Simplified architecture can deliver Windows Server (RDS) or VDI desktops from a single console, speeding production deployments by as much as 80 percent. Automated physical to virtual app migration tools powered by Citrix AppDNA software speed application migration time by 90 percent compared to manual validation. Powerful new administration features automate common tasks while integrating the configuration of profile management, StoreFront, publishing and storage optimization. Built as an open platform that can be deployed on any hypervisor or cloud management solution, including Citrix CloudPlatform™, powered by Apache CloudStack, or Amazon Web Services.

Availability

XenDesktop 7 will be available in June 2013. XenDesktop 7 is available in Platinum, Enterprise and VDI editions on a per-user, per-device or concurrent basis. In addition, the new XenDesktop App edition is available for all hosted-shared (RDS) app and desktop workloads. XenApp Enterprise and Platinum customers with active Subscription Advantage can update to this edition at no additional charge and migrate their environments at their own pace.

Citrix XenApp 6.5 Hotfix Rollup Pack 2 BETA

Citrix has recently announced Hotfix Rollup pack 2 for XenApp 6.5 into Beta.

We have successfully deployed the Hotfix Rollup into our Test environment and so far we have no issues to report.

The following Citrix hot fixes have been added into the rollup:

XA650R01W2K8R2X64001, XA650R01W2K8R2X64002, XA650R01W2K8R2X64003, XA650R01W2K8R2X64004, XA650R01W2K8R2X64005, XA650R01W2K8R2X64006, XA650R01W2K8R2X64007, XA650R01W2K8R2X64009, XA650R01W2K8R2X64010, XA650R01W2K8R2X64011, XA650R01W2K8R2X64012, XA650R01W2K8R2X64013, XA650R01W2K8R2X64014, XA650R01W2K8R2X64015, XA650R01W2K8R2X64016, XA650R01W2K8R2X64017, XA650R01W2K8R2X64018, XA650R01W2K8R2X64019, XA650R01W2K8R2X64020, XA650R01W2K8R2X64021, XA650R01W2K8R2X64022, XA650R01W2K8R2X64023, XA650R01W2K8R2X64024, XA650R01W2K8R2X64025, XA650R01W2K8R2X64026, XA650R01W2K8R2X64027, XA650R01W2K8R2X64028, XA650R01W2K8R2X64029, XA650R01W2K8R2X64030, XA650R01W2K8R2X64031, XA650R01W2K8R2X64033, XA650R01W2K8R2X64034, XA650R01W2K8R2X64036, XA650R01W2K8R2X64037, XA650R01W2K8R2X64038, XA650R01W2K8R2X64039, XA650R01W2K8R2X64040, XA650R01W2K8R2X64042, XA650R01W2K8R2X64043, XA650R01W2K8R2X64044, XA650R01W2K8R2X64045, XA650R01W2K8R2X64046, XA650R01W2K8R2X64047, XA650R01W2K8R2X64048, XA650R01W2K8R2X64049, XA650R01W2K8R2X64050, XA650R01W2K8R2X64051, XA650R01W2K8R2X64052, XA650R01W2K8R2X64053, XA650R01W2K8R2X64055, XA650R01W2K8R2X64056, XA650R01W2K8R2X64057, XA650R01W2K8R2X64058, XA650R01W2K8R2X64059, XA650R01W2K8R2X64060, XA650R01W2K8R2X64061, XA650R01W2K8R2X64062, XA650R01W2K8R2X64063, XA650R01W2K8R2X64064, XA650R01W2K8R2X64065, XA650R01W2K8R2X64066, XA650R01W2K8R2X64067, XA650R01W2K8R2X64068, XA650R01W2K8R2X64069, XA650R01W2K8R2X64070, XA650R01W2K8R2X64071, XA650R01W2K8R2X64074, XA650R01W2K8R2X64077, XA650R01W2K8R2X64078, XA650R01W2K8R2X64080, XA650R01W2K8R2X64082, XA650R01W2K8R2X64083, XA650R01W2K8R2X64084, XA650R01W2K8R2X64086, XA650R01W2K8R2X64087, XA650R01W2K8R2X64088, XA650R01W2K8R2X64090, XA650W2K8R2X64032, XA650W2K8R2X64033, XA650W2K8R2X64034, XA650W2K8R2X64036, XA650W2K8R2X64R01

As you can see this will save a lot of post implementation patching, and if like us you like to keep things as up to date as possible, will save you time in the long run

The Citrix Patch can be downloaded from here:

http://support.citrix.com/article/CTX137585

If you would like any assistance in deploying patch or remedial work to your Citrix environments please feel free to give us a call on 0330 088 3338